Template Commands


Below is a guide to the template commands and examples of how they can be used.

We know templates can appear complex, so if you have any questions or need any help, just email us at info@.com

Need help? We can create your custom templates for you. Just tell us what you need it to do, and we can code it. Basic advice is free; for more complex work, there may be a fee. Contact us for details.

List of commands:


ignore_case_on();

Turns on case ignoring when matching (searching for) a text to replace.

ignore_case_off();

Turns off case ignoring when matching (searching for) a text to replace.

find_and_replace_regexp_text(‘Enter regular expression to find in HTML file’, ’Enter regular expression to match and replace in text strings that were found by previous expression’, ‘Regular expression or text used to replace any regexp matches from second expression’);

This powerful command can be used to do some regular expression find/replace/remove HTML processing for a given text that will be found by the first parameter of that command.

For example, the following command will search input HTML for a body tag, and it would process its manually entered emails (as text), and it would convert them to HTML versions of them.

find_and_replace_regexp_text(‘<body.*?</body>’,'([\w-]+)@([\w-]+\.)+\w+’,'<a href=”mailto:$0″>$0</a>’);


Input HTML:

<html xmlns=”http://www.w3.org/1999/xhtml”>

  <head>

    <title>EMAIL@TEST.COM</title>

  </head>

  <body>

    <p>

      EMAIL@TEST.COM

    </p>

  </body>

</html>

Output HTML:

<html xmlns=”http://www.w3.org/1999/xhtml”>

  <head>

    <title>EMAIL@TEST.COM</title>

  </head>

  <body>

    <p>

      <a href=”mailto:EMAIL@TEST.COM”>EMAIL@TEST.COM</a>

    </p>

  </body>

</html>

That command only processed the body (blue part) of the input HTML, and it changed its EMAIL@TEST.COM to the HTML version. If that command were executed for the whole input HTML, it would also change the email that is entered in <title>EMAIL@TEST.COM</title>, which would cause HTML syntax issues.

Example 2:

find_and_replace_regexp_text(‘<p[^<>]*?>.*?</p>’,'([\w-]+)@([\w-]+\.)+\w+’,'<a href=”mailto:$0″>$0</a>’);


Input HTML:

<html xmlns=”http://www.w3.org/1999/xhtml”>

  <head> 

    <title>EMAIL@TEST.COM</title>

  </head>

  <body>

    <p>

      EMAIL@TEST.COM

    </p>

    <span>

      EMAIL_SPAN@TEST.COM

    </span> 

    <p>

      EMAIL2@TEST2.COM

    </p>

  </body>

</html>


Output HTML:

<html xmlns=”http://www.w3.org/1999/xhtml”>

  <head> 

    <title>EMAIL@TEST.COM</title>

  </head>

  <body>

    <p>

      <a href=”mailto:EMAIL@TEST.COM”>EMAIL@TEST.COM</a>

    </p>

    <span>

      EMAIL_SPAN@TEST.COM

    </span> 

    <p>

      <a href=”mailto:EMAIL2@TEST2.COM”>EMAIL2@TEST2.COM</a>

    </p>

  </body>

</html>

That command was looking for any <p>…</p> tag occurrence in the input HTML and it changed its EMAIL@TEST.COM to the HTML version. If that command were executed for the whole input HTML, it would also change the email that is entered in <title>EMAIL@TEST.COM</title>, which would cause HTML syntax issues.

Please note that it did not process the <span> tag email.

replace_text(‘Text to replace in HTML file’, ’New text’);

A simple command to find and replace any text in an HTML file.

Example – finds all ‘foo1’ strings in the HTML file and replaces them with ‘foo2’:

Command:

replace_text(‘foo1′,’foo2’);

Input HTML:

<p>foo1 example</p>

<p>foo1foo1foo1</p>

<foo1>foo1</foo1>

Output:

<p>foo2 example</p>

<p>foo2foo2foo2</p>

<foo2>foo2</foo2>

replace_inner_text(‘Text to replace only inside HTML tags(inner text)’, ’New text’);

A simple command to find and replace in the inner text of an HTML file.

Example – finds all ‘foo1’ strings in inner text in html file and replaces it with ‘foo2’:

Command:

replace_inner_text(‘foo1′,’foo2’);

Input HTML:

<p>foo1 example</p>

<p>foo1foo1foo1</p>

<foo1>foo1</foo1>

Output:

<p>foo2 example</p>

<p>foo2foo2foo2</p>

<foo1>foo2</foo1>

replace_regexp_text(‘Enter regular expression to match in HTML file’, ‘Text used to replace any regexp matches’);

Command to find and replace text in an HTML file. The first parameter can contain regular expressions, and the second one can contain backreferences if there are any in the first parameter. For regexp backreferences, please look in the regular expressions tutorial.

Example 1– finds all <p>…</p> tags in html file and replaces it with ‘foo’ string:

Command:

replace_regexp_text(‘<p>.*?</p>’,’foo’);

Input HTML:

<p>foo1 example</p>

<p>foo1foo1foo1</p>

<foo1>foo1</foo1>

Output:

foo

foo

<foo1>foo1</foo1>

Example 2– finds all <p>…</p> tags in html file and leaves only inner text of <p> tag:

Command:

replace_regexp_text(‘<p>(.*?)</p>’,’$1′);

Input HTML:

<p>foo1 example</p>

<p>foo1<p>foo2</p><b>bold</b></p>

<foo1>foo1</foo1>

Output:

foo1 example

foo1<p>foo2<b>bold</b></p> !- this html line is broken because <p></p> tag was embedded in other <p></p> tag and example 2 regexp is mathing <p> and first occurrence of </p> closing tag

<foo1>foo1</foo1>

Example 3– deletes all <p>…</p> tags in html file:

Command:

replace_regexp_text(‘<p[^>/]*>.+?</p>’,”);

Input HTML:

<p>foo1 example</p>

<p>foo1<p>foo2</p><b>bold</b></p>

<foo1>foo1</foo1>

Output:

!- first line was removed correctly, but the line below was not all removed because <p> tags were embedded

<b>bold</b></p>

<foo1>foo1</foo1>

replace_tag_attribute(‘HTML tag to replace’, ‘HTML Attribute’, ‘New HTML Attribute’);

Command replaces the defined tag attribute with a new one in the HTML file.

Example – finds all <p> tags with attribute ‘id=”…”’ in an HTML file and replaces it with other_attribute=”ABC”:

Command:

replace_tag_attribute(‘p’,’id’,’other_attribute=”ABC”‘);

Input HTML:

<p id=”123″ bgcolor=”#ff00ff”>foo1 example</p>

<p bgcolor=”#ff00ff” id=”XYZ” >foo1 example</p>

<p>foo1 id=100</p>

Output:

<p other_attribute=”ABC” bgcolor=”#ff00ff”>foo1 example</p>

<p bgcolor=”#ff00ff” other_attribute=”ABC” >foo1 example</p>

<p>foo1 id=100</p>

replace_tag_attribute_no_quotes(‘HTML tag to replace’, ‘HTML Attribute’, ’New HTML Attribute’);

Command replaces the defined tag attribute with a new one in the HTML file. No quotes means that the attribute value has no “” (quotes).

Example – finds all <p> tags with attribute ‘id=…’ in in html file and replaces it with other_attribute=”ABC”:

Command:

replace_tag_attribute_no_quotes(‘p’,’id’,’other_attribute=”ABC”‘);

Input HTML:

<p id=123 bgcolor=”#ff00ff”>foo1 example</p>

<p bgcolor=”#ff00ff” id=”XYZ” >foo1 example</p>

<p>foo1 id=100</p>

Output:

<p other_attribute=”ABC” bgcolor=”#ff00ff”>foo1 example</p>

<p bgcolor=”#ff00ff” id=”XYZ”>foo1 example</p>

<p>foo1 other_attribute=”ABC”</p>

replace_tag_attribute_value(‘HTML tag to replace’, ‘HTML Attribute value to replace’, ’New value’);

Command replaces the defined tag attribute value with a new value in the HTML file.

Example – finds all <p> tags with attribute ‘id=”…”’ in an HTML file and replaces them with ABC:

Command:

replace_tag_attribute_value(‘p’,’id’,’ABC’);

Input HTML:

<p id=”123″ bgcolor=”#ff00ff”>foo1 example</p>

<p bgcolor=”#ff00ff” id=’XYZ’ >foo1 example</p>

<p>foo1 id=100</p>

Output:

<p id=”ABC” bgcolor=”#ff00ff”>foo1 example</p>

<p bgcolor=”#ff00ff” id=’ABC‘ >foo1 example</p>

<p>foo1 id=100</p>

replace_tag_attribute_value_no_quotes(‘HTML tag to replace’ , ‘HTML Attribute value to replace’, ‘New value’);

Command replaces the defined tag attribute value with a new value in the HTML file. No quotes means that the attribute value has no “” (quotes).

Example – finds all <p> tags with attribute ‘id=…’ in an HTML file and replaces them with ABC:

Command:

replace_tag_attribute_value_no_quotes(‘p’,’id’,’ABC’);

Input HTML:

<p id=123 bgcolor=”#ff00ff”>foo1 example</p>

<p bgcolor=”#ff00ff” id=”XYZ” >foo1 example</p>

<p>foo1 id=100</p>

Output:

<p id=ABC bgcolor=”#ff00ff”>foo1 example</p>

<p bgcolor=”#ff00ff” id=”XYZ” >foo1 example</p>

<p>foo1 id=ABC</p>


replace_inner_text_for_tag(‘HTML tag in which inner text will be replaced’, ‘Text to replace’, ‘New text’);

Command replaces the defined tag’s inner text, the first occurrence only of the parameter string to replace with the new string in the HTML file.

Example – finds all <p …> tags with ‘foo’ inside tag and replaces it with XXX:

Command:

replace_inner_text_for_tag(‘p’,’foo’,’XXX’);

Input HTML:

<p id=”123″>foo1 example</p>

<p bgcolor=”#ff00ff”>xxx foo examplefoo</p>

<p>foo2</p>

Output:

<p id=”123″>XXX1 example</p>

<p bgcolor=”#ff00ff”>xxx XXX examplefoo</p> !- blue underlined foo was not changed because this command matches first occurrence of foo only

<p>XXX2</p>

delete_tag(‘HTML tag to delete in whole file’);

Command deletes the defined tag HTML but leaves its contents in the HTML file.

Example – delete all <p …></p> tags:

Command:

delete_tag(‘p’);

Input HTML:

<p id=123>foo1 example</p>

<p bgcolor=”#ffeecc”>foo1<p>foo2</p><b>bold</b></p>

Output:

foo1 example

foo1foo2<b>bold</b>

delete_tag_with_content(‘HTML tag to delete in whole file’);

Command deletes the defined tag HTML with its inner contents from the HTML file.

Example – delete all <p …>…</p> tags:

Command:

delete_tag_with_content(‘p’);

Input HTML:

<p id=123>foo1 example</p>

<p bgcolor=”#ffeecc”>foo1<p>foo2</p><b>bold</b></p>

<b>foo</b>

Output:

!- first line was removed correctly, but the line below was not all removed because <p> tags were embedded

<b>bold</b></p>

<b>foo</b>

delete_text(‘Text to delete in HTML file’);

Command deletes defined text in the HTML file.

Example – delete all ‘foo‘ strings:

Command:

delete_text(‘foo’);

Input HTML:

<p id=foo>foo1 example</p>

<p bgcolor=”#ffeecc”>foo1<p>foo2</p><b>bold</b></p>

<foo1>foo1</foo1>

Output:

<p id=>1 example</p>

<p bgcolor=”#ffeecc”>1<p>2</p><b>bold</b></p>

<1>1</1>

delete_inner_text(‘Text to delete only inside HTML tags[inner text]’);

Command deletes the first occurrence of defined text in the inner text of an HTML tag in an HTML file.

Example – delete all ‘foo‘ strings in inner HTML:

Command:

delete_inner_text(‘foo’);

Input HTML:

<p id=foo>foo1 example</p>

<p bgcolor=”#ffeecc”>foo1<p>foofoofoo2</p><b>bold</b></p>

<foo1>foo1</foo1>

Output:

<p id=foo>1 example</p>

<p bgcolor=”#ffeecc”>1<p>foofoo2</p><b>bold</b></p> !- foofoo was not removed because it was the second and third occurrences

<foo1>1</foo1>

delete_regexp_text(‘Enter regular expression to delete in html file’);

Command to delete text in an HTML file. Parameters can contain a regular expression.

Example 1– deletes all <p>…</p> tags in html file:

Command:

delete_regexp_text(‘<p>.*?</p>’);

Input HTML:

<p id=foo>foo1 example</p>

<p bgcolor=”#ffeecc”>foo1<p>foofoofoo2</p><b>bold</b></p>

<p>foo1foo1foo1</p>

<foo1>foo1</foo1>

Output:

<p id=foo>foo1 example</p>

<p bgcolor=”#ffeecc”>foo1<b>bold</b></p>

<foo1>foo1</foo1>

delete_inner_text_for_tag(‘HTML tag in which inner text will be replaced’, ‘Text to delete’);

Command deletes the second parameter string in the defined tag’s inner text in the HTML file. It deletes the first occurrence of the second parameter only.

Example – finds all <p …> tags with ‘foo’ inside tag and deletes its fist occurrence:

Command:

delete_inner_text_for_tag(‘p’,’foo’);

Input HTML:

<p id=”123″>foo1 example</p>

<p bgcolor=”#ff00ff”>xxx foo examplefoo</p>

<p>foo2</p>

Output:

<p id=”123″>1 example</p>

<p bgcolor=”#ff00ff”>xxx examplefoo</p> !- blue underlined foo was not deleted because this command matches the first occurrence of foo only

<p>2</p>

delete_all_empty_tags();

Removes all empty tags (Empty tag: <tag>any white space inside</tag>).
For example: <p></p> or <p>    </p> – will be removed from HTML.

delete_attribute(‘Attribute to delete in HTML file for every tag’);

Remove the defined HTML tag attribute from all HTML tags in the source HTML.

Example:

delete_attribute(‘style’);

Input HTML:

<p class=”test” style=”width:100px”>Test</p>

<span class=”test2” style=”height:100px”>Test2</span>

Output HTML:

<p class=”test”>Test</p>

<span class=”test2”>Test2</span>

delete_empty_tag(‘HTML tag to delete in whole file’);

Removes defined tag that is empty (Empty tag: <tag>any white space inside</tag>), for example, a command to remove all empty ‘p’ tags will be like this:

delete_empty_tag(‘p’);


Will result in all empty tags being removed from the HTML file

Input HTML:

<p>   </p>

<p>TEST</p>

Output:

<p>TEST</p>

delete_tag_with_content(‘HTML tag to delete in whole file’);

Removes the defined tag with its inner content (inner text or HTML).

Example:

delete_tag_with_content(‘body’);


Will remove the body tag with all internal (inner) content it has.

delete_tag_attribute(‘HTML tag in which attribute will be deleted’, ‘Attribute name’);

Command deletes the defined tag attribute in the HTML file.

Example – finds all <p> tags with attribute ‘id=”…”’ in an HTML file and deletes its first occurrence:

Command:

delete_tag_attribute(‘p’,’id’);

Input HTML:

<p id=”123″ bgcolor=”#ff00ff”>foo1 example</p>

<p id=”123″ bgcolor=”#ff00ff” id=”123″>foo1 example</p>

<p>foo1 id=”100″</p>

Output:

<p bgcolor=”#ff00ff”>foo1 example</p>

<p bgcolor=”#ff00ff” id=”123″>foo1 example</p> !- blue underlined text was not deleted because this command matches the first occurrence of foo only

<p>foo1 id=”100″</p>

delete_all_tag_attributes(‘HTML tag in which all attributes will be deleted’);

Command deletes all attributes in the HTML file for a given tag.

Example – delete all <p> tag attributes in the HTML file:

Command:

delete_all_tag_attributes(‘p’);

Input HTML:

<p id=”123″ bgcolor=”#ff00ff”>foo1 example</p>

<p id=”123″ bgcolor=”#ff00ff” id=”123″>foo1 example</p>

<p>foo1 id=”100″</p>

Output:

<p>foo1 example</p>

<p>foo1 example</p>

<p>foo1 id=”100″</p>

add_tag_attribute(‘HTML tag to which attribute will be added’, ‘New attribute with value’);

Command adds a defined attribute to a tag in an HTML file.

Example – add to all <p> tags attribute ‘id=”123”’ in html file:

Command:

add_tag_attribute(‘p’,’id=”123”’);

Input HTML:

<p id=123 >foo1 example</p>

<p bgcolor=”#ffeecc”>foo1<p>foo2</p><b>bold</b></p>

<b>foo</b>

Output:

<p id=123 id=”123″>foo1 example</p>

<p bgcolor=”#ffeecc” id=”123″>foo1<p>foo2</p><b>bold</b></p>

<b>foo</b>

add_html_after_opening_tag(‘HTML opening tag after which HTML will be added’, ‘Text/HTML string’);

Command adds text or HTML after the opening tag in the HTML file.

Example – adds after all <p> tags ‘<b>A Bold Text Example</b>‘ in html file:

Command:

add_html_after_opening_tag(‘p’,'<b>A Bold Text Example</b>’);

Input HTML:

<p id=123 >foo1 example</p>

<p bgcolor=”#ffeecc”>foo1<p>foo2</p><b>bold</b></p>

<b>foo</b>

Output:

<p id=123><b>A Bold Text Example</b>foo1 example</p>

<p bgcolor=”#ffeecc”><b>A Bold Text Example</b>foo1<p><b>A Bold Text Example</b>foo2</p><b>bold</b></p>

<b>foo</b>

add_html_after_closing_tag(‘HTML closing tag after which HTML will be added’, ‘Text/HTML string’);

Command adds text or HTML after the closing tag in the HTML file.

Example – add after all </p> tags ‘<b>A Bold Text Example</b>‘ in html file:

Command:

add_html_after_closing_tag(‘p’,'<b>A Bold Text Example</b>’);

Input HTML:

<p id=123 >foo1 example</p>

<p bgcolor=”#ffeecc”>foo1<p>foo2</p><b>bold</b></p>

<b>foo</b>

Output:

<p id=123>foo1 example</p><b>A Bold Text Example</b>

<p bgcolor=”#ffeecc”>foo1<p>foo2</p><b>A Bold Text Example</b><b>bold</b></p><b>A Bold Text Example</b>

<b>foo</b>

add_html_before_opening_tag(‘HTML opening tag before which HTML will be added’, ‘Text/HTML string’);

Command adds text or HTML before the opening tag in the HTML file.

Example – add before all <p> tags ‘<b>A Bold Text Example</b>‘ in html file:

Command:

add_html_before_opening_tag(‘p’,'<b>A Bold Text Example</b>’);

Input HTML:

<p id=123 >foo1 example</p>

<p bgcolor=”#ffeecc”>foo1<p>foo2</p><b>bold</b></p>

<b>foo</b>

Output:

<b>A Bold Text Example</b><p id=123>foo1 example</p>

<b>A Bold Text Example</b><p bgcolor=”#ffeecc”>foo1<b>A Bold Text Example</b><p>foo2</p><b>bold</b></p>

<b>foo</b>

add_html_before_closing_tag(‘HTML closing tag before which HTML will be added’, ‘Text/HTML string’);

Command adds text or HTML before the closing tag in the HTML file.

Example – add before all </p> tags ‘<b>A Bold Text Example</b>‘ in html file:

Command:

add_html_before_closing_tag(‘p’,'<b>A Bold Text Example</b>’);

Input HTML:

<p id=123 >foo1 example</p>

<p bgcolor=”#ffeecc”>foo1<p>foo2</p><b>bold</b></p>

<b>foo</b>

Output:

<p id=123>foo1 example<b>A Bold Text Example</b></p>

<p bgcolor=”#ffeecc”>foo1<p>foo2<b>A Bold Text Example</b></p><b>bold</b><b>A Bold Text Example</b></p>

<b>foo</b>


Backing up/transferring templates

Each template has its own file; this makes it very easy to back up the templates folder or share your templates with a colleague.

The templates are located in this folder for Doc Converter Pro 3 or older: C:\Program Files (x86)\DocConverterPro\Templates 

Doc Converter Pro 4 stores templates in the: C:\ProgramData\DocConveterPro\Templates

You can copy and paste them, just like any normal file. When you open Doc Converter Pro, the program will automatically detect any new templates and add them to the drop-down templates list.

We store the templates in a .wc file format. This format is basically a text file, so you can open the template files in Notepad or any other editor.

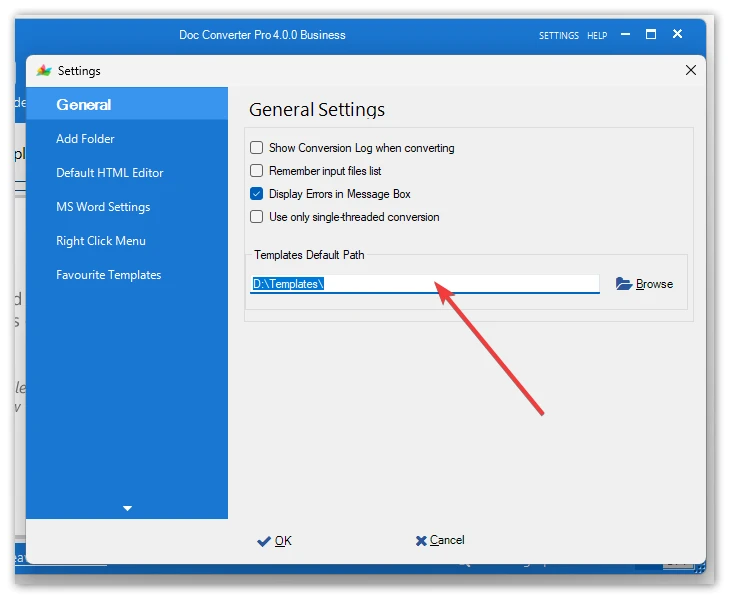
Please note that you can move the templates to any other folder (for example, a common shared network folder) and set the path to it in the Settings:

Editing the templates in a text editor

We recommend you use the built-in editor on Doc Converter Pro to edit templates. But you can edit the templates in any text editor of your choice, for example notepad etc.

We store the templates in a .wc file format. This format is basically a text file so you can open the template files in notepad or any other editor.

The templates are located in this folder: C:\Program Files (x86)\DocConverterPro\Templates

You can easily open the template folder by clicking templates radial menu and then Folder button:

Guide to the templates that come with Doc Converter Pro

Below is a quick guide to the templates that come with Doc Converter Pro.

Convert to HTML

This will convert your file to XHTML 1.0 Transitional and keep all the formatting, e.g. fonts, background, colours, etc.

Convert to HTML5

This will convert your file to HTML5 and keep all the formatting, e.g. fonts, background, colours, etc.

Convert to Fixed HTML Layout

Convert your file to HTML with the closest visual layout to your input document.

Convert to plain TXT

This template will convert your files to plain text files.

Convert to HTML and remove formatting

This will convert your file to XHTML 1.0 and remove all the formatting, giving you nice, clean HTML.

Clean up existing Word HTML files

If you have existing Word HTML files, Doc Converter Pro will clean them up for you. It will remove all unneeded tags. It will still keep your layout and formatting, but your files will be smaller and cleaner.

Convert to HTML embed images

You can embed images directly into your HTML file, so you do not need separate image files – this is a great way to make files self-contained. You can have this option in any template, just edit the template and go to the images section. Please note that your HTML size may get a lot bigger (long webpage load time), so it’s not recommended to embed if your document has many images.

Convert to HTML body only for CMS

This will convert your file to XHTML and keep all the formatting, e.g. fonts, background, colours, etc. It will remove the head section, leaving you with the body code. This is useful if you want to paste HTML into a content management system (CMS) or a template. If you preview your converted file in a browser and you see weird characters, this is because there is no head section in the file. Insert the code into your CMS, then preview it; it should be ok.

All the other templates are easy to understand based on their names…

How to Create Templates

Easy template editor

The core of Doc Converter Pro is the powerful template system. Here you can edit the built-in templates, duplicate templates, and create your own templates. To enter this section, just click on the radial button next to the Templates list on the main screen. Remember to first select the template you want to edit/duplicate/delete by selecting a template from the drop-down list.

tipTip: Remember, you can edit or duplicate and modify the templates that come with Doc Converter Pro.

In the Easy Editor tab, all you need to do is click on options on the left and select the options you need on the right side.

You can also preview how your template will work. At the top, you have the Template Preview tab (3rd tab). There, you can select a file to convert and preview its HTML code and see how it looks in the browser. You can go back to Easy Editor, make some changes, and go back to Template Preview, click the Preview file button again to see how Doc Converter Pro will convert your document.


Template Overview

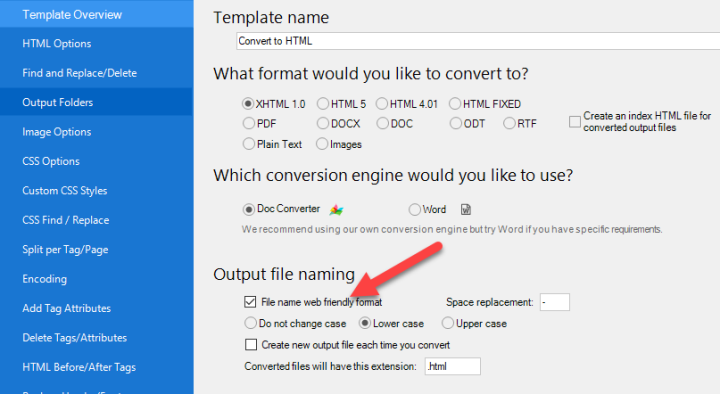
Converting format (1): Doc Converter Pro can save files in different formats. The main conversion format is XHTML 1.0, HTML5, HTML4, HTML FIXED (fixed layout – HTML looks exactly like in your Word document), but Doc Converter Pro can save files as  PDF, DOCX/DOC, ODT, RFT, text files (TXT),  MARKDOWN, or save document pages as graphic image files (jpg, png, webp, gif, bmp, wmf). When saving to images, you can also create either a single or separate HTML file for each page saved as an image. The ‘Create an index HTML file for converted output file’ option is useful when you convert many files, and you want to have a list with <a> links referencing all converted files. Doc Converter Pro will create an index.html file in the same folder as your source documents are located. Later, you can upload all converted HTML files to a website and use those index file links on a web page.

What conversion engine should I use? (2) Always try our built-in Doc Converter first.

Output file naming (3): One of the cool features of Doc Converter Pro is the ability to automatically rename output files to make them web-friendly. By default, Doc Converter Pro will save documents with web-friendly file names. You can turn it off by unticking the ‘File name web-friendly format’ checkbox.

By default, all spaces will be changed to the dash character ‘-‘ (Space replacement), but you can specify your replacement character. All special characters (not URL-friendly) will be deleted from the file name. Doc Converter Pro will try to convert language-specific characters to their equivalent in the ASCII character set (eg, äöü.doc will be saved to an aou.html file).

You can also control the case of output file names. Doc Converter Pro can save file names without changing them or can save them to lowercase or uppercase letters.

The ‘Create new output file each time you convert’ option is useful if you want to create a new file each time you convert the same document. It can be useful if you want to compare differences in files to see how different templates create different output content. If you tick this, then if the converted file name already exists in the folder, Doc Converter Pro will not overwrite it. For example, if your Word file is called aboutus.doc, and aboutus.html exists in the same folder, then Doc Converter Pro will rename the new converted file to aboutus_1.html. Turning this option off will overwrite the existing HTML file, so be careful.

By default, Doc Converter Pro will save files with a .html extension, but if you want to, you can set your extension.

HTML input file options (4): Backup HTML files before cleaning if input and output file names are the same’ – Ticking this will make Doc Converter Pro create a backup of any HTML file before it cleans it if input and output file names are the same. It will prevent overwriting input HTML files.

Process HTML input file by conversion engine’ – If you tick this option, your HTML will be processed by either our Internal Converter or MS Word (depending on the option you tick above). This means you can use all the customisation options in the templates.  If you do not tick this option, then options like Image Output Folder, CSS, Image & Metadata options will not work. The reason you would untick this option would be if you find the Internal Converter or MS Word conversion process is affecting your HTML in a bad way. If you untick this option, then we will only run find and replace/delete commands on your files, so it’s a safer option if you find you have problems with code being changed.

Template notes (5): Here, you can write your reminder notes about the template you’re creating.

HTML Options
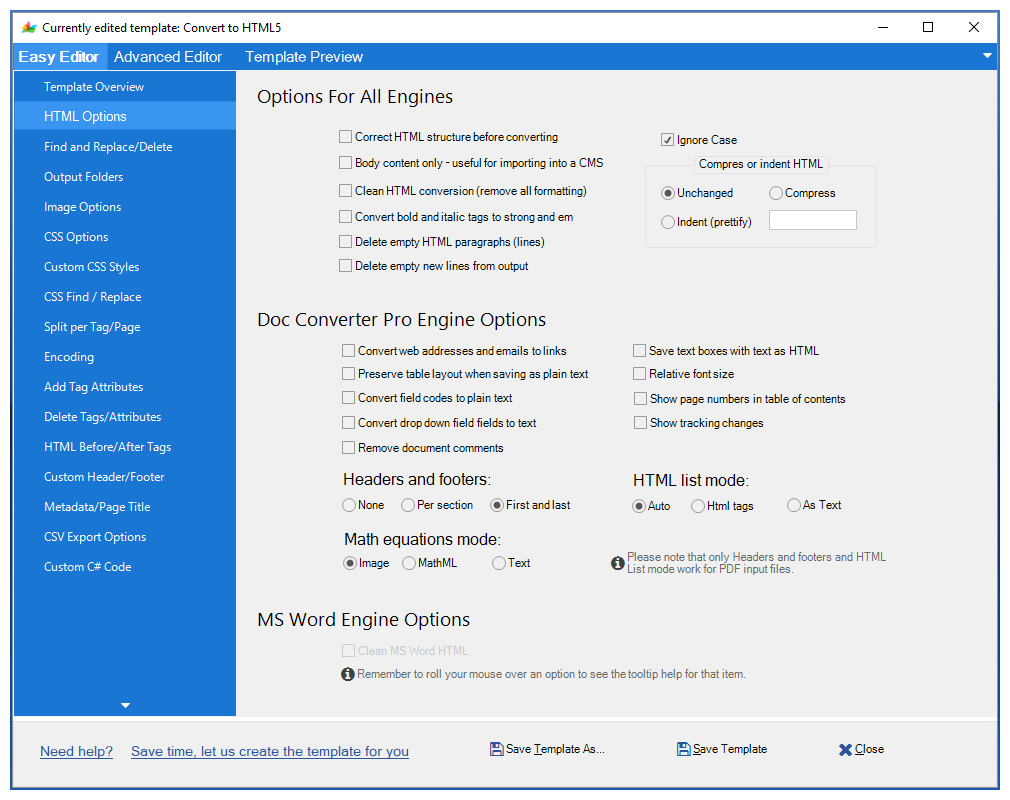
Options for all engines

Correct HTML structure before converting – With this option ticked, Doc Converter Pro will fix problems with code structure before converting with the template. Please use this option only if you know that the input HTML may have a structure problem; otherwise, do not tick this option.

Body content only – Useful for importing into a CMS. If you tick this option, Doc Converter Pro will remove the head section of the HTML and just leave the body tag content. This is useful if you want to paste HTML into a content management system (CMS) or a template.

Clean HTML Conversion – This will remove all the formatting, e.g. styles, font size, font type, etc. This is a good option if you want clean HTML or you intend to use your own CSS styles. Note it will not remove bold and italic formatting.

Convert bold and italic tags to strong and em – With this option ticked, Doc Converter Pro will convert <b> tags to <strong> and <i> to <em>. Strong and em are the new standard for bold and italic.

Delete empty HTML paragraphs (lines) – If you tick this option, Doc Converter Pro will remove any paragraphs <p…z>….</p> containing any white space chars (spaces, tabs, new lines etc) or &nbsp; or &#xa0;  entities.

Delete empty new lines from output – Doc Converter Pro will delete empty new lines (more than one new line in a row) found in the HTML or TXT files. Gives cleaner HTML output.

Ignore case – If you tick this option, Doc Converter Pro will ignore the case when looking for code. For example, if the ignore case is turned OFF, if you ask Doc Converter Pro to find the code <p class=”HEADING_1″>, it would only find <p class=”HEADING_1″>, not <p class=”heading_1″>. Note how in the second example, HEADING_1 is in lowercase.  Turning the ignore case on means that Doc Converter Pro will ignore that case of the code, and in our example, it would find <p class=”HEADING_1″> and the lowercase <p class=”heading_1″>

Compress or indent HTML – Compress (minify) HTML output (smaller but less readable HTML) or indent it (prettify, a bigger HTML output, but it’s easier to read HTML in the source editor). By default, Doc Converter Pro does not compress or indent HTML output.

Doc Converter Pro engine options

Convert web addresses and emails to links – Ticking this option will convert any web or email addresses to clickable hyperlinks. This option only works with the Doc Converter conversion engine. Please note that using this feature may cause longer conversion times.

Preserve table layout when saving as plain text – Ticking this option helps to preserve the table layout when saving to text format. e.g., data in columns will stay on the same row.

Convert field codes to plain text – Converts any document field codes into static text; otherwise, INPUT HTML elements.

Convert drop-down fields to text – when enabled, it exports drop-down form fields as normal text; otherwise exports drop-down form fields as a SELECT element in HTML.

Remove document comments – when enabled, all document comments will be removed from the output HTML.

Save text boxes with text as HTML – Doc Converter Pro will convert text boxes with text content as HTML. Please note that any border of the text box will be removed, but it can be added back via a custom CSS style rule in the template if needed. When turned off, text boxes will be saved as image files. Please note that it’s an experimental feature of Doc Converter Pro, and it may not produce good results for advanced text boxes.

Relative font size – Font sizes will be output in relative (em) units when saving to HTML. In many existing documents (HTML, EPUB), font sizes are specified in relative units. This allows applications to adjust text size when viewing/processing documents. When this option is enabled, document elements other than text will still have absolute sizes. Also, some text-related attributes might be expressed absolutely. In particular, line spacing specified with the “exactly” rule might produce unwanted results when scaling text.

Show page numbers in table of contents – When this option is on, Doc Converter Pro will show page numbers in table of contents links (TOC). By default, this option is turned off.

Show tracking changes – When this option is on, Doc Converter Pro will show any document tracking changes in the converted HTML.

Headers and footers – Control how the document header and footer are converted. You can set ‘None’, and headers and footers will not be exported. ‘Per section’ – primary headers and footers are exported at the beginning and the end of each section. ‘First and last’ – the primary header of the first section is exported at the beginning of the document, and the primary footer is at the end.

HTML list mode – Specifies how list labels are exported to HTML:

  • Auto – Outputs list labels in auto mode. Uses HTML native elements when possible.
  • HTML tags – Outputs all list labels as HTML native elements.
  • As text – Outputs all list labels as inline text.

Math equations mode – Specifies how math equations will be exported to HTML: as images, MathML, or text.

MS Word Engine Options

Clean MS Word HTML – With this option enabled, Doc Converter Pro will remove any unneeded Word-specific HTML code from your existing MS Word HTML file. You don’t have to use this option for the Doc Converter engine, or if you convert files in doc/docx/rtf/odt format.
 

Pdf Options
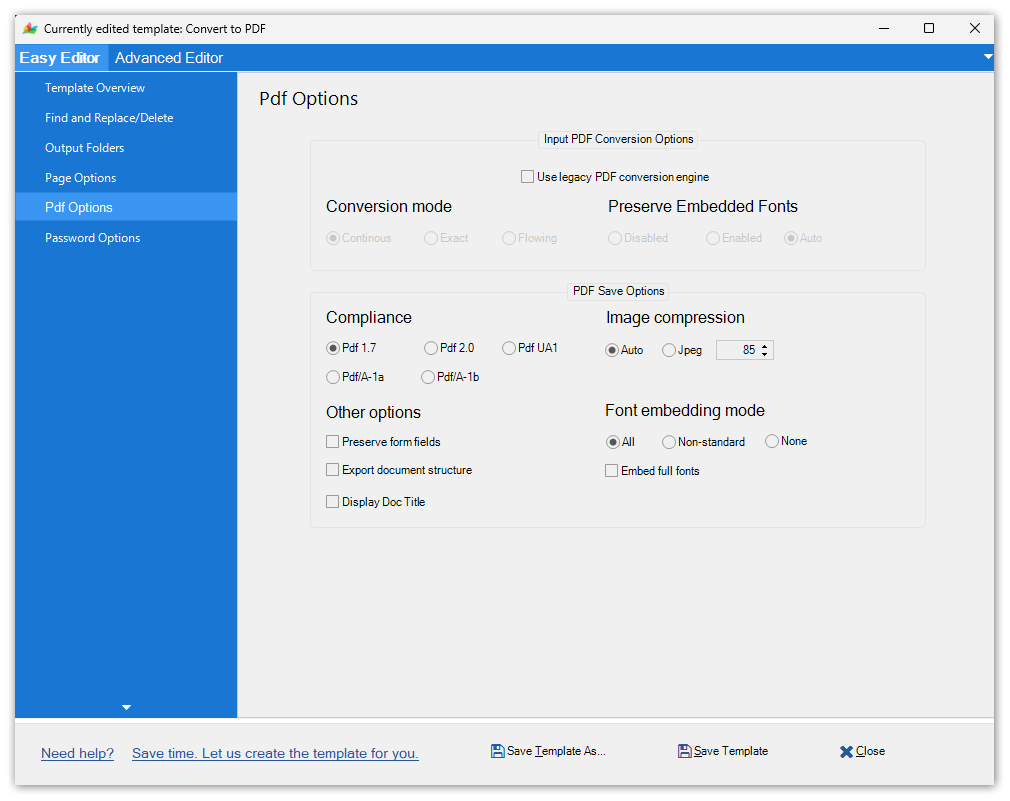
Selecting the PDF output option shows this PDF Options tab, where you can specify additional PDF input and output conversion options. Doc Converter Pro 4 has changed its PDF conversion engine to a new one, but you can use the old legacy one if you enable the ‘Use legacy PDF conversion engine’ option. Also, in DCP 4, you can select PDF 2.0 compliance.

Fixed HTML Options
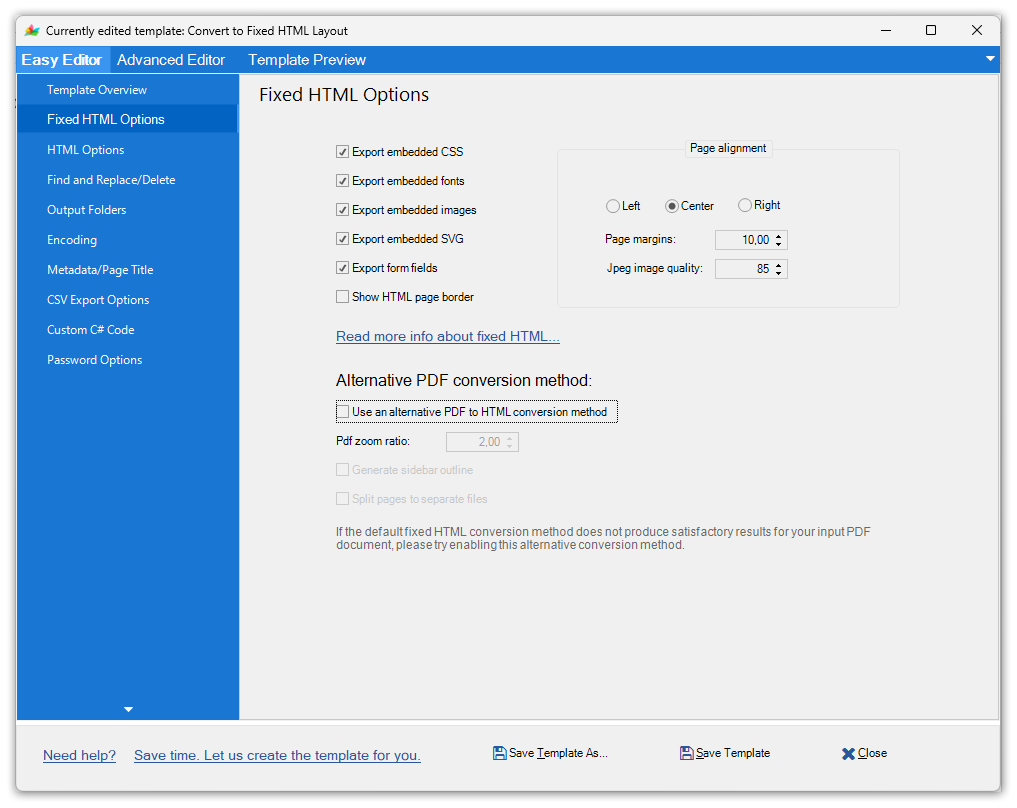
Selecting the HTML FIXED output option shows this Fixed HTML Options tab, where you can specify additional conversion options.

Find and Replace/Delete
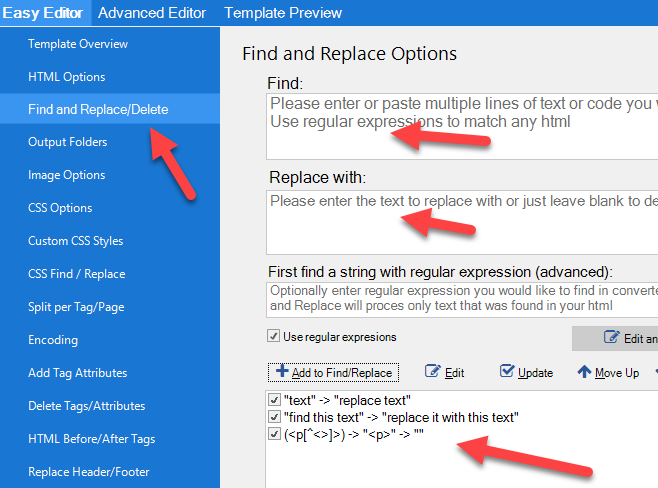
These options allow you to find and replace or delete any text or regular expression.  For instance, if you want to find all <p…> tags with all attributes in an HTML or text file and replace them with <p>, you have to use regular expressions: <p[^<>]*>. Regular expressions are a very powerful tool when doing find and replace in any text file. Doc Converter Pro 4 can find and replace text in documents directly. For example, you can add, change or remove text in Word documents directly. Please make a backup of the input documents if you are converting documents in the same folder. We recommend setting some other Output conversion folder (info below).

Regular Expressions Support

T:\Documents\websites\zapadoo-V2\helpfilev4.5\images\tip.gifWe support .NET Regular Expressions (RegEx) in find and replace commands. See this page for more information.

Output Folders

Output Folder Options

Place converted files in the same folder as the files to convert – Doc Converter Pro will save all converted files in the same folder as the files to be converted.

Place files in a specific folder – You can specify your output conversion folder. Click the Browse button to select the output folder or type/paste the relative (e.g.: ‘my converted files’) or absolute (e.g.: ‘D:/My converted files’) folder path in the text box for that option.

Image Folder options

Place images in the same folder as the converted files – this default option of Doc Converter Pro will save all images in the same folder as the converted output file. Each converted file will have a separate folder with images. Folder name and image file names are based on the converted file output file name.

Place images in their own folder in the same location as the converted files – set your own relative images folder name (e.g.: ‘images’). Please note that this folder will be used for all converted document image files.

Place images in this specific folder – set your own absolute images folder name (e.g.: ‘D:/images’). Please note that this folder will be used for all converted document image files.

Images absolute or relative URL – set a custom image URL or a relative prefix part of the URL for images in your HTML. It’s useful if you copy HTML into your website that has a custom folder for images.

File name images prefix – set a custom image file name prefix, for example: image, picture, etc. By default, output image file names are based on input document file names.

Image Options

Image options – if there are images in your Word File, you can select what image format you want to convert them to. The options are: PNG, JPG, WebP, GIF, BMP or WMF. There is also an option to control the JPG or WebP compression level; the higher it is, the better quality the image will be, but the file size rises in accordance. Generally, for photos, you should use JPG or WebP; for clipart and graphics, use PNG.

Highest image quality– generally, it should increase the quality of images. By default, DPI is set to 96 dpi, but you can change this in the drop-down selector. 96dpi is the recommended image quality level for web images; any higher and your images will be large and slow to load. The high-quality option will slow down conversion slightly, so if you are converting lots of files and image quality is not important to you, you can experiment with turning this option off.

Getting small images?  Try turning off the highest image quality option.

Keep <img> tag height/width attributes – this option will make Doc Converter Pro keep the height and width image attributes in the HTML. Un-ticking it will remove those attributes from the converted HTML.

Embed images – You can embed images directly into your HTML file, so you do not need separate image files – this is a great way to make files self-contained. Please note this feature is only supported by new browsers like Google Chrome, Safari, Firefox or Edge.

Tip: Consider experimenting with PNG or WebP, as it is now supported by all major browsers, e.g. Chrome, Edge, Firefox, Opera, Safari, etc.

CSS Options

No CSS – If you tick this option, no CSS will be used in the HTML file. Basic CSS formatting, like bold and em, will still be kept.

Inline CSS – Inline is where all CSS is put into the tag ‘style’ attribute of the HTML code, not in a <style> tag.

Normal CSS – The CSS is put into the head <style> tag section of the HTML file and sometimes in the tag style attribute.

Save CSS in a separate file – this will put all the CSS into a separate CSS file and link it to the HTML file.

Save CSS in a separate custom folder/file name – this will put all the CSS into a separate custom CSS file name that you will specify and link to the HTML file.

The ‘Delete CSS rules not being used in HTML’ option is useful in Normal and both Save CSS options to remove any CSS rules that are not used in the output HTML.

You can add your own CSS files to the converted HTML by entering each file name per line in the text box below:

In the box above, only enter the CSS file name and location, e.g. style.css or /css/style.css. Doc Converter Pro will automatically add the full CSS tag and link it to the HTML file. Note: For Save CSS in separate file option, Doc Converter Pro will already contain a CSS file link tag.

Also, you can enter CSS styles to keep or remove.

You can add your own CSS rules to the Custom CSS styles page:

CSS Find/Replace

CSS Customisation options allow you to find and replace, rename, or delete any CSS rule names in the HTML document that is being processed.


Step 1) Manually enter CSS rule names in the Find text box, or you can load rule names from a document by clicking the ‘Get CSS Rules From Document’ button. The dropdown list on the left side of that button will be filled with CSS rule names that you can select.

Step 2) Enter a new replace it with the CSS rule name, or leave it empty to delete it from the CSS rules. You can get CSS rules from an external CSS styles file or an HTML file that contains a <style> tag with CSS rules by clicking the ‘Get CSS Rules From CSS File’ button.

Step 3) Click the ‘Add to Find/Replace List’ button.

Page/Tag Splitting


Split per tag – This will split the page based on a tag, for example, h1. If you select h1, Doc Converter Pro will look for the h1 tag and place all the code from the h1 tag onwards into its file.

By default, we will name split files with the file name and the tag’s inner text. For example, if your file is called catalogue, files will be called catalogue_introduction.html, catalogue_products.html, etc. If you tick the numbered output file names, then the names would be catalogue_1.html, catalogue_2.html, etc. This feature sets the Custom page title option to #PAGESPLITTAGTEXT# constant under the Metadata / Page Title tab; you can add any custom text before or after this constant string.

Split per page – This will convert each page of your document to its HTML file. For example, if your text file has 4 pages, Doc Converter Pro will create 4 separate .html pages, one for each page.

Create an index file – You can create an index file with links to the files created using the split page option. This option is in the Template Overview tab – Converting format section.


Encoding

Load and Save file encoding – these options allow you to set the input and output file character encoding. If you don’t need to change the encoding, leave these options to the AUTO value.

Save files with UTF8 BOM marker’ – If you tick this option, Doc Converter Pro will save all files with a UTF8 special marker (special characters at the beginning of the text file) that is used to detect UTF8 file encoding.

Notify me if AUTO encoding cannot determine encoding from HTML file’ – If you tick this option, Doc Converter Pro will notify you if the input file encoding cannot be determined.

Convert special chars to HTML Entities – these options will convert the output file’s non-ASCII or special chars to their equivalent HTML entities. If we take as an example the copyright symbol: ©, as a numbered entity would be: &#169; and as a named entity it would be: &copy; . If you do not know what option to select, then just select do not convert.

By default, all Doc Converter Pro template files are encoded as UTF-8. Most English Web Pages are encoded in UTF-8. If you are cleaning existing HTML files that are encoded differently, e.g. ANSI, then you will need to change the template encoding setting to match the encoding of the file you are cleaning (the opened template encoding will be automatically changed to the selected Load Encoding).

Please do not modify Load Encoding in the Advanced Editor because the template code will not be converted to the new encoding – please use the Easy Editor Encoding section – Load Encoding option.

Add Tag Attributes

This section allows you to add attributes to any HTML tag.

Delete Tags/Attributes

Remove HTML Tags – this will delete all references to the tag in the file, but it will leave the content that was in that tag. To delete the content in the tag, tick the remove tag with content option.

Remove all tag attributes – If you added the tag p, it would remove all attributes of the p tag. For example: <p class=”aboutustxt”> would become <p>

Remove attributes globally – If you added the style attributes, then it would delete all references of the style attribute across all tags in the file.

Remove empty tags – This option allows you to remove any empty tags. For example, if you enter span, it will delete all empty span tags. Ticking the remove all empty tags option will automatically delete any empty tags in the file without you having to specify the tags.

Metadata/Page Title

Metadata options – allow you to add/edit the metadata information contained in the head section of the HTML file. Please note that if your document does not have any metadata, then we cannot add it automatically. For example, if you tick the author option and enter the text ‘Mark Smith’, then this will be inserted into the HTML as <meta name=”author” content=”Mark Smith />

Page title options – If you use it, Doc Converter Pro will change the <title>…</title> tag in the HTML. For example, if you enter about us, it will change the title to <title>about us</title>. You can enter a custom title, or you can get Doc Converter Pro to use the file name for the title text. For example, if your file is called ‘my file.doc’, then the title tag will be <title>my file</title>.

Please note that metadata variables can be used for the metadata section, on Find and Replace/Delete and in Advanced Editor. Variable names that can be used as parameters:

#TITLE#, #AUTHOR#, #SUBJECT#, #KEYWORDS#, #CATEGORY#, #COMMENTS#, #COMPANY#, #CREATIONDATE#, #LASTSAVETIME#, #MANAGER#, #PAGES#, #REVISIONNUMBER#

Example command:

add_html_after_opening_tag(‘HEAD’,'<meta name=”title” content=”#TITLE#”>\r\n’);

HTML Before/After Tags

Add any HTML before and after tags in converted files. For instance, you can add custom metadata, style links, and script links in the <head> tag or add some JavaScript code before the end of the </body> tag.

Please note that this feature is only available in the Doc Converter Pro Business version.

Replace Header/Footer

Specify your HTML header (from the HTML file start to the <body> tag) and footer (from the </body> tag till the end of the file) sections.

Please note that this feature is only available in the Doc Converter Pro Business version.

CSV Export Options

Doc Converter Pro can export converted files to the CSV format that you can then import into a database or Excel. For instance, you can configure template embed images in HTML and split by h1 tag and create a CSV file in WordPress posts table format.  You can import that CSV file with a WordPress CSV Import plugin.

Please note that this feature is only available in the Doc Converter Pro Business version.

Custom C# Code
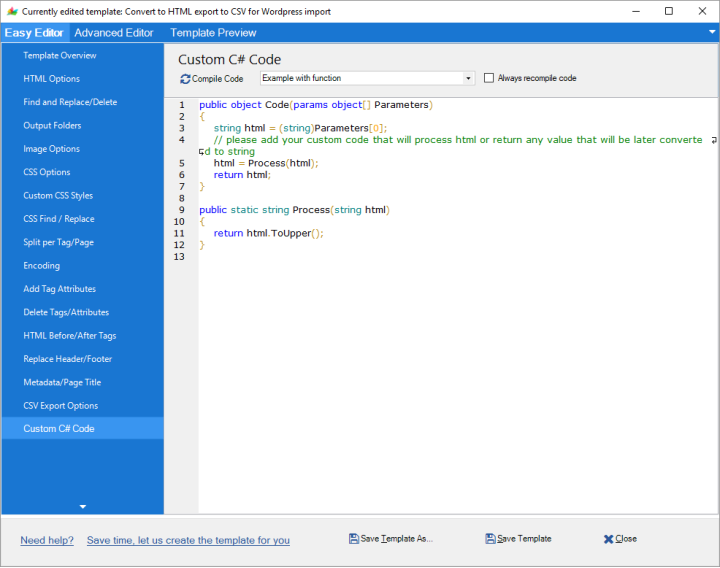
Custom C# code can additionally process converted HTML or text in any way you want. It’s a very powerful feature in Doc Converter Pro for users with C# and .NET programming knowledge. For instance, you can use C# code if you have some special tags in your document that you would like to dynamically replace with your text or values (e.g.: current date/time, counter values, some generated text/strings, etc).

Please note that this feature is only available in the Doc Converter Pro Business version.

Password Options

In Doc Converter Pro 4, you can specify the input document password and/or set the output password for Word, PDF, and ODT documents.


Advanced Template editor screen

Need help? We can create your custom templates for you. Just tell us what you need it to do, and we can code it. Basic advice is free. For more complex work, there may be a fee. Contact us for details.

For advanced users, we have the advanced template editor. You access this by clicking the tab at the top of the template editor screen.

The first thing to be aware of is that creating templates is not as complicated as it first looks. We have created a custom template system that should cover the needs of most users.

At a basic level, the template system should be considered like a find-and-replace system. You can look for a specific code and then edit or delete it.

T:\Documents\websites\zapadoo-V2\helpfilev4.5\images\tip.gifWe support .NET Regular Expressions (RegEx) in find and replace commands. See this page for more information.

On the screen grab below, you can see the template editor screen, which has several main parts:

Command area: This is where you create the command you want to add to the template.

  1. The first step is to select a command from the drop-down list. For example, say we want to delete the span tag for a document. We select the delete_tag command.
  2. The second step is to add the parameters. For example, if we enter the span tag. You can enter the tag manually or select it from the drop-down tag/attribute list.
  3. The third step is to add the command to the template by clicking the Add Command button.

Edit/delete a command: To edit or delete a command, you should first click on it in the editor area, then click on the Edit or Delete Command button.

Template preview area: You can test out your template by selecting a test file in the Template Preview tab. This enables you to easily tweak and test your template until you are happy with it.

Editor area: Here, you can directly edit the template commands. Pressing control and space will show you a list of commands.

In the screengrab example below, there is a sample command: delete_tag(‘span’); – this will delete the span tag from your file.

How to convert Word Files to HTML files


 There are four ways of doing this:

 1: Converting one file at a time

Open up the Doc Converter Pro program. Click on the ‘Add Files’ button and from the dialogue box that opens, select the Word file that you wish to convert and click on OK. The file will be added to the list of files to be converted. If you wish, you can click on ‘Add Files’ again to select another file to be added to the conversion list. Once you have selected all the files you wish to convert, you will need to select the template you want to use for the conversion.

tipRemember, you can show only specific file types by selecting from the drop-down file type list. See screengrab below:

file-name.png

2: Convert an entire directory

This option allows you to select an entire directory, and Doc Converter Pro will convert all the files within it. Just open the program and click on the ‘Add Folder’ and then browse to the folder you want to choose. Once you have selected the folder, click OK to add all files to the list. You can filter particular types in the Doc Converter Pro settings in the Add Folder options.


3: Convert a file from within Word

Doc Converter Pro inserts a button into Microsoft Word. If you don’t see the button, please verify that you’ve installed Doc Converter Pro MS Word Add-in first. You can select the template you want and click on the Convert button – it will launch the Doc Converter Pro program behind the scenes and convert the document you have opened in Word.

4: Right-click on a file conversion – copy to clipboard

A great new feature of Doc Converter Pro is the ability to right-click on a file, click ‘Convert to clipboard…’, and Doc Converter Pro will automatically convert the file and paste the contents into the clipboard, ready to be pasted into another app or CMS. The right click shows your currently selected Doc Converter Pro template and supports up to three favourite templates. You can set the templates to use in the Doc Converter Pro settings.


Frequently Asked Questions


The formatting is not right or content is missing?

Please try converting both with the internal conversion engine and using Word to convert. This option is in the Template Overview settings:

 C:\Users\brian\AppData\Local\Temp\SNAGHTML100a3063.PNG

What conversion engine should I use?

There are two conversion engines to choose from. Our built in Doc Converter Engine should cover 99% of your needs but we also offer you the option to convert with Word. The Word option is useful if you have problems converting specific content but always try the Doc Converter engine first.

So which one should I use? Our advice is to try the Doc Converter Pro engine first (it should cover most needs), then MS Word. The table below covers the key areas of difference. The table only shows areas of difference. Features that work across all conversion engines like XHTML support are not listed to keep things simple. Assume anything not listed below will work across all engines.

Conversion Engines – Quick Comparison


Feature

Doc Converter Pro

MS Word

UL/OL formatted lists

yes

simple lists only

MS Word needs to be installed

no

yes

Inline CSS

yes

no

Header and Footer

yes, user can control it

no

Image ATL and Description (title)

yes, only alt

yes, all + description

Convert PDF to HTML

no

yes, Word 2013 or newer only


I want to replace <b> with <strong>, or <i> with <em>

All you need to do is tick the option in the easy template editor main screen:

Can I convert Open Office .odt files?

You sure can. For best results use the Doc Converter conversion engine. If you have MS Word 2007 or above on your machine you should also be able to use the MS Word conversion engine.

How to disable auto renaming of files

One of the cool features of Doc Converter Pro is the ability to automatically rename output files to make them web friendly.

For example, if your Word file is called Contact Us.doc Doc Converter Pro will rename the converted file to contact-us.html

To make them web friendly we change spaces to dashes and convert uppercase letters to lowercase. We also give you control over what character you want to use to replace spaces. You can also select if you want the case changed to lowercase or uppercase.

If you do not want this feature you can disable it in the template settings screen:

Still have a question? Please email: info@documentconverter.pro


Guide to the Settings

To open Doc Converter Pro Settings, click on the selected SETTINGS button:

This will show the following settings window:

Settings button: Most of the settings are self-explanatory, but here is a guide to the main settings:


General options

Show Conversion Log when converting – this option will always show the Conversion Log window (shown below) when files are converted. The log is useful to help you see how long it takes to convert files and troubleshoot any conversion errors.


Remember input files list – Doc Converter Pro will remember all input files you have added to your files list each time you start the Doc Converter Pro application. This is useful if you regularly convert the same documents.

Display Errors in Message Box – by turning this option off, Doc Converter Pro will add any errors to the Conversion Log only; otherwise, Doc Converter Pro will show a window with error details each time an error occurs. Turning this option off is useful when you batch convert a lot of files, and you don’t want to interrupt the Doc Converter Pro conversion by showing the errors window. If any errors occur during conversion, Doc Converter Pro will report them only in the Conversion Log.

Use single-threaded conversion – enabling this option will cause Doc Converter Pro to convert your documents one by one in a sequence. If this option is disabled, then conversion will run in parallel mode (all CPU cores will be used to convert documents) to speed up conversion if you’re converting many files. There are rare cases when conversion in multi-threaded mode causes issues when converting many files with the MS Word engine, which is why there is an option to enable single-threaded conversion mode.

Add Folder
Add folder file types: You can choose what type of files will be visible when you are adding files to the file list. This is useful for folders with mixed file types, e.g. you can set it to only show .doc files.

Scan subfolders: if you tick this option, when you add a folder to the file list, it will also include the contents of any subfolders within the folder.

Default HTML Editor

Use internal editor: Doc Converter Pro has a built-in code editor, but you can specify a different editor if you like.

MS Word Settings

Install/Uninstall MS Word Button Add-in: Clicking this will make Doc Converter Pro install an add-in into Microsoft Word. Please note that the Doc Converter Pro MS Word Add-in feature is a separate installer. Normally, the toolbar is installed as part of the main Doc Converter Pro installation. You should not need to install it separately.

After successful add-in installation, MS Word will show the following tab:

When you click on the Convert button, it will launch the Doc Converter Pro program and convert the currently active MS Word document. You can also click the Convert to Clipboard button to convert the current document and copy its converted contents to the clipboard, ready for pasting.

Very important! Before you install the Button:

Please note you will need to close MS Word (the best is to close any MS Office apps) before you run the installer. If you have problems installing it, please reboot your computer and do not open any programs before running the installer again. The installer requires Word to be closed, but sometimes it can run in the background, as programs like Outlook will link into Word. For advanced users, you can also use the task manager and kill any references to winword.exe before installing.

Right Click Menu

The right-click feature lets you right-click on a file in Windows Explorer and convert it directly. You can enable or disable the Doc Converter Pro right-click menu. By default, the Doc Converter Pro right-click menu is enabled. When, for some reason, you want to disable it, please click the ‘Turn Off/On Explorer Right Click Menu’ button.


Favourite Templates

You can select up to 3 templates that will appear on the right-click to convert a file option. A great new feature of Doc Converter Pro is the ability to right-click on a file, select convert, and Doc Converter Pro will automatically convert the file and paste the contents into the clipboard, ready to be pasted into another app or CMS. The right click supports up to three templates, and you can set the templates to use in the settings ribbon.


Guide to the Main Window

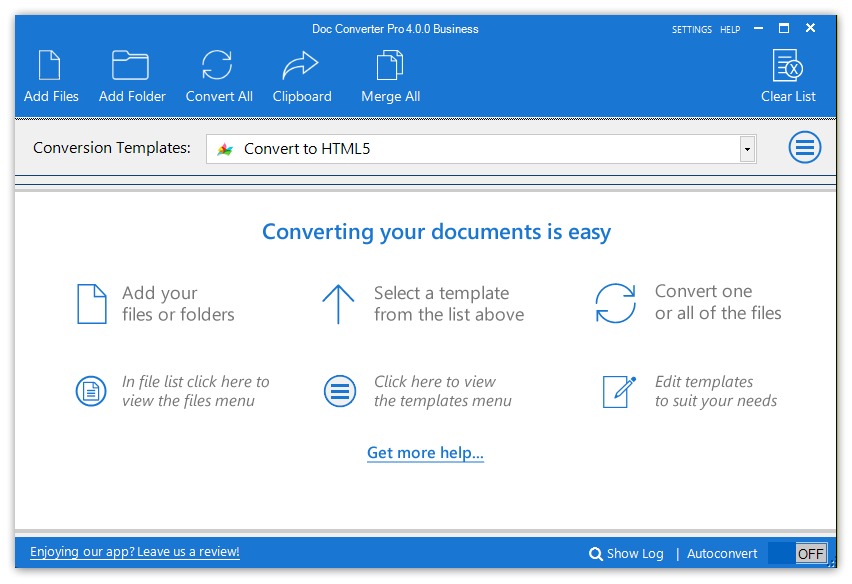
When you launch Doc Converter Pro, you will see that we try to keep the interface simple.

The Main Doc Converter Pro Window:

  • Add Files button: Click this button to browse for a file to convert. Note that in the settings screen, you can choose the file types you want to be selected.
  • Add Folder button: Click this button to select a folder and convert/clean all the files in the folder. In the settings screen, you can turn on or off the option to scan subfolders.
  • Convert All button: Clicking this will start the conversion process and convert all files in the list.
  • Clipboard: Convert the contents of your clipboard with the chosen template. For example, you can copy text from Word, then click this button to convert it to HTML.
  • Merge All: Merge all the files in the list into one file. e.g., you could merge three different Word files into one Word file.
  • Template Drop-Down List: This is where you select the template that you want to use for the conversion.
  • Edit Templates Button: This is the 3-bar round button next to the template drop-down. This is where you can add/edit, import and delete the templates.

Along the bottom of the screen, you have options to clear your list of files, show the conversion log, and toggle Autoconvert off and on. If you enable Autoconvert, any files you add to the screen will be automatically converted without you having to click the convert button.

Files To Convert List:

This is where you can see and manage all files you are converting and the status of the conversion.

  • File name renaming: Doc Converter Pro will automatically create a web-friendly HTML file name based on your document file name, as spaces in HTML file names can cause problems. So ‘About us.doc’ will become ‘about-us.html’.  If your Word file had spaces in the name, Doc Converter Pro will replace them with a dash (-) or your own specified replacement character instead (it can be defined in Template Overview).

Note: You can also change the default converted file name by double-clicking on the converted file name and entering your own file name.

Reorder file list: You can reorder the list of files by clicking on them and dragging them up and down. This is useful when you are using the merge feature, as it will merge in order of files.

Conversion status

Converted files will have a green tick beside them. Files that did not convert will show a red cross.

File options radial menu

You can click on any file in the list circle button and show a range of common commands, as shown in the screen grab above.

  • Convert – convert the selected file only.
  • Browser View – this will show you the converted file in your default browser.
  • Edit – preview and edit the converted file HTML code in the Doc Converter Pro internal HTML editor or with your own editor that you can specify in the settings section (top of main window).
  • To Clipboard – it will copy the converted file HTML to the clipboard, ready for pasting into another application.
  • Delete – removes the selected document from the files list.
  • Open Folder
    1. If the file has not been converted, it will open the folder on your computer that contains the source document.
    2. If the file has been converted, it will open up the location of the converted file. This is normally the same location as the input file, but you can specify a direct output folder in the template settings.

The main ways to convert your files

You can convert your files in 4 ways:

1: With the main Doc Converter Pro application

2: With the Doc Converter Pro toolbar, we insert into Microsoft Word

3: By right-clicking on a file in Windows Explorer

4: Via Command line if you have a business version