How Can We Help?
When you launch Doc Converter Pro, you will see that we try to keep the interface simple.
The Main Doc Converter Pro Window:
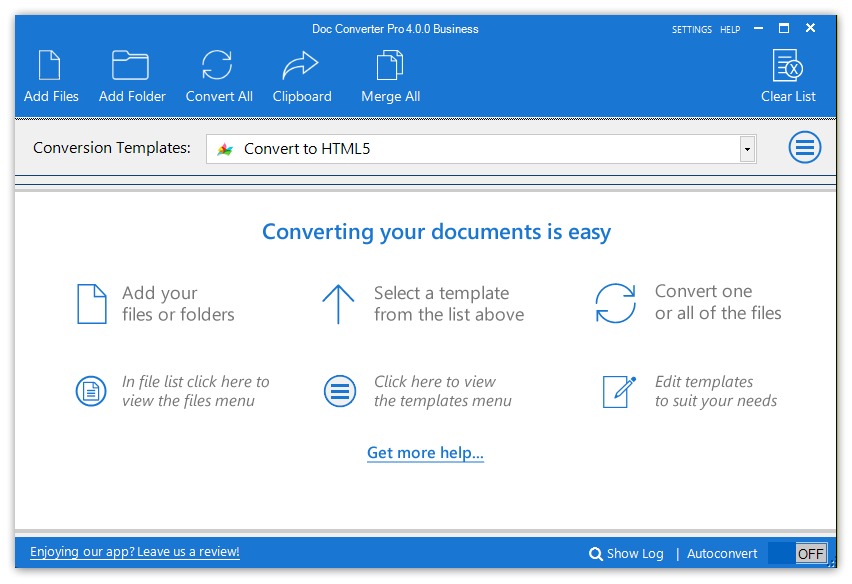
- Add Files button: Click this button to browse for a file to convert. Note that in the settings screen, you can choose the file types you want to be selected.
- Add Folder button: Click this button to select a folder and convert/clean all the files in the folder. In the settings screen, you can turn on or off the option to scan subfolders.
- Convert All button: Clicking this will start the conversion process and convert all files in the list.
- Clipboard: Convert the contents of your clipboard with the chosen template. For example, you can copy text from Word, then click this button to convert it to HTML.
- Merge All: Merge all the files in the list into one file. e.g., you could merge three different Word files into one Word file.
- Template Drop-Down List: This is where you select the template that you want to use for the conversion.
- Edit Templates Button: This is the 3-bar round button next to the template drop-down. This is where you can add/edit, import and delete the templates.
Along the bottom of the screen, you have options to clear your list of files, show the conversion log, and toggle Autoconvert off and on. If you enable Autoconvert, any files you add to the screen will be automatically converted without you having to click the convert button.
Files To Convert List:

This is where you can see and manage all files you are converting and the status of the conversion.
- File name renaming: Doc Converter Pro will automatically create a web-friendly HTML file name based on your document file name, as spaces in HTML file names can cause problems. So ‘About us.doc’ will become ‘about-us.html’. If your Word file had spaces in the name, Doc Converter Pro will replace them with a dash (-) or your own specified replacement character instead (it can be defined in Template Overview).
Note: You can also change the default converted file name by double-clicking on the converted file name and entering your own file name.
Reorder file list: You can reorder the list of files by clicking on them and dragging them up and down. This is useful when you are using the merge feature, as it will merge in order of files.
Conversion status
Converted files will have a green tick beside them. Files that did not convert will show a red cross.

File options radial menu
You can click on any file in the list circle button and show a range of common commands, as shown in the screen grab above.

- Convert – convert the selected file only.
- Browser View – this will show you the converted file in your default browser.
- Edit – preview and edit the converted file HTML code in the Doc Converter Pro internal HTML editor or with your own editor that you can specify in the settings section (top of main window).
- To Clipboard – it will copy the converted file HTML to the clipboard, ready for pasting into another application.
- Delete – removes the selected document from the files list.
- Open Folder
- If the file has not been converted, it will open the folder on your computer that contains the source document.
- If the file has been converted, it will open up the location of the converted file. This is normally the same location as the input file, but you can specify a direct output folder in the template settings.